In this day and age, it’s no lie that there is a myriad of ways to move your body. There’s also a lot of different styles of how to teach these movements. Yoga alone features at least 8 major forms and hundreds of variants of each! Amidst the plethora of options we have to move and learn how to move, have you ever wondered what works best or most efficiently?
It’s easy to get lost in how to cue postures, proper demonstration techniques, and then there’s the widely debated topic of physical assisting! Most of all this is taught in a few lectures in your teacher training, and then that’s it. It’s confusing and overwhelming.
Thankfully, there is something that can help better your understanding:
Welcome to Neuroscience!
What is Neuroscience you ask?
It’s the mind in the mindfulness
It’s the driver of our movement
It’s how we take, process, & interact with our environment
It’s likely something you practice every moment, without formerly knowing about it!
In this article, we’ll take a dive specifically into Motor Control and Motor Learning. These terms refer to how your brain intakes information and translates that into a posture or an exercise. More specifically: It’s how our cues, demonstrations, & assists are interpreted and translated into postures, exercises & movement!
⇒ Motor Control: The process of initiating, directing, and grading purposeful voluntary movement
⇒ Motor Learning: The process of acquiring a skill by which the learner, through practice and assimilation, refines and makes automatic the desired movement
The two terms are very similar and are often used interchangeably, to break it down further:
Motor Control is how we practice movement,
Motor Learning is how that movement becomes a habit.
Moving seems pretty mindless, right? Without much thought to moving you can probably get up, move from point A to point B, pick something up with relative ease and carry it, plus you probably have a good idea how to listen or watch someone do something and mimic it. But actually, how you communicate to your body largely affects how it will move.
The Impact of Neuroscience in Yoga Asana in a nutshell:
Stimulation of a higher density of nerves in the area = More activation in our nervous system
An activated nervous system leads to more conscious & unconscious awareness, which translates to a safer & more efficient movement
So why do you need to know (some) neuroscience as a movement teacher?
To make your instructions intrinsically safer and more sustainable for your students!
Feedback and stimulation from the body are received through the senses, interpreted by the brain, and within milliseconds processed into movement. Classic example: you touch something hot, and your hand quickly withdraws without you having to think about it.
What I’ve described above is a sensory-motor outcome.
⇒ Sensory: Feedback from sight, sound, touch, etc. This feedback comes from our specialized nerve cells like proprioceptors, mechanoreceptors, optic nerves, etc.
⇒ Motor: Position of the body, posture, or movement into a position. Examples would be exercises, yoga postures, movement, etc.
⇒ Sensory-Motor Loop: Feedback from the body is received, interpreted, and within milliseconds processed into movement.
The concept of Motor Control is actually its own branch of psychology and neurology, based on the way we communicate and how that results in movement. But of course, you already knew that because it was taught in your yoga teacher training, right?

Yeah, you probably didn’t hear about this at all in your YTT, huh? That’s crazy because you definitely practiced it! It’s how we, yoga teachers, teach postures, and it’s also how we as students learn postures!

Ya, you’ve been a deputy neuroscientist this whole time!
Allow me to fill in the gap in your training because this knowledge is essential to becoming an effective and proficient yoga teacher or movement educator. And I’m not talking $300 3-hour seminar essential; this should have been a part of your training and not something you have to pay extra to understand. But hey, I’m not demonizing your training. Many YTTs and movement education trainings haven’t updated their curriculum to include it, and many don’t realize the potential behind its use. My intention, as always, is to make you better informed than the rest of the folks out there. You’ll likely be surprised by the fact you’ve been practicing neuroscience and motor control in some form too!
Haven’t done a yoga teacher training? Don’t stop reading! While this article is mainly geared toward yoga teachers and other movement educators (coaches, trainers, etc.), it can still give you a leg up. For my non-teacher audience, you can use what you’ll learn here to evaluate your instructors and see how effectively they communicate!
Here’s the agenda for today’s knowledge train:
- Info: Motor Control – What is it? & the fancy brain science behind it
- Practical: Cueing & Implementation of Motor Control in a teaching environment
Only 2 sections? This may be my shortest article yet! 😉 HAH! Strap in; this one is going to be a rollercoaster of knowledge & fun.
Motor Control: What is it?
We’ve already talked about the definition of motor control: it’s how we use and interpret incoming sensory information during exercise or movement. Now it’s time to get into the nitty-gritty.
Disclaimer: This is where the info can get a little heavy. You can skip this section, but it does set up everything I offer in the practical section.
There are 3 main kinds of Motor Control:
1. Spinal & Brainstem
2. Subcortical
3. Cortical
Spinal & Brainstem Motor Control:
Quite simply, these are your spinal reflexes. They are deeply ingrained in your nervous system, and aside from variations and pathologies, everyone has them.
Examples:
- Deep tendon reflexes: Think of when your doctor smacks your knee with a hammer, and your knee spontaneously extends.
- Primitive reflexes: As our nervous systems develop, these reflexes help us eat and move. Usually, they go away after certain developmental milestones. (Examples of the Reflexes: Galant, Traction Test, or Landau.)
- Vestibular reflexes: These have to do with our eyes & ears and our systems of balance, such as the Righting Reflex to keep the head upright and level with the horizon. Because our vision isn’t aligned with the horizon line this is likely one of the culprits in why it is so hard to look up in Ardha Chandrasana!
- Pathologic reflexes: These are how we, doctors, can assess the state and potential pathology or deterioration of the nervous system. These reflexes become present when someone’s nervous system has become compromised (Examples: Rossolimos, Mendel-Bechterew, etc.)
There’s definitely more, but there’s no need to delve much further here unless you’re going around in your classes with a reflex hammer to hit people’s tendons (please don’t do that).

Note: If you would like more info about some of the reflexes I referenced above, I suggest you Google or Wikipedia them, the information is pretty easy to find & readily available. It’s quite fascinating to watch on Youtube too!
Subcortical Motor Control:
This kind of motor control has to do with the position of your body in space, or what we nerds call intrinsic automatic movement. You usually don’t have to think about this too much. Using subcortical motor control, you receive and integrate most of the sensory information from your nerves through so-called recurrent feedback loops.
The output from these loops contributes to how big of a response your body has, and also to when and in what order movement happens.
***I’ll be elaborating more about these feedback loops in Part III of this series. (Part III is geared around how change occurs in our body in both the short term and long term. These feedback loops are how we can quickly adapt to a task/demand)
For those intrigued by the beauty of the Brain here’s a brief overview of the components of your Subcortical region:
⇒ Limbic System: emotional and behavioral processes, motivation, long-term memory, and olfaction (aka smelling – our nose is connected directly to the brain because it’s our most primitive sensory feedback!)
⇒ Diencephalon:
• Thalamus: relaying sensory and motor signals to the cerebral cortex (conscious movement- the next segment), also regulates consciousness, sleep, & alertness
• Hypothalamus: fluid and electrolyte balance, food ingestion, energy balance, reproduction, thermoregulation, immune, & emotional responses
• Epithalamus: connects limbic system to other parts of the brain, secretes melatonin & other hormones from the Pineal Gland (the Pineal Gland is located right where we often say “Third Eye Center”), circadian rhythm, & contributes to the regulation of motor pathways and emotions
• Subthalamus: Motor Control
• Metathalamus: Vision & Hearing (our other two most primal senses!)
⇒ Ventricles: Produce cerebrospinal fluid (CSF), which helps bathe and cushion the brain and spinal cord.
The lesson here is that there’s a lot that goes on under the surface of our conscious perception. The Diencephalon alone controls SO MUCH in regards to how we move and regulate our body!
The best way to summarize subcortical motor control:
It’s automatic, and always occurring. It’s all the nuances of movement you usually don’t have to pay attention to; it just happens because our nervous system is one incredible borderline magic thing.
Cortical Motor Control:
Finally the main event: the Cortex of the brain! There are honestly a ton of things that go on in this area of the brain. Thinking, consciousness, information processing, understanding language, producing, etc. If you can think it (made you use your cortex, haha!), it likely has ties to this area. This is the most highly developed region in the human brain; you could almost argue that it’s what makes us human.
Anyway, enough of me geeking out about the cortex. Coming back to the theme of our article, this area of the brain is where learned motor functions occur. The subcortical region takes in information and relays it to the Cortex where sensory info becomes analyzed, processed, and interpreted. For example; language starts as a collection of sound, like grunts and groans, until it reaches your cortex and is interpreted into words that carry meaning!
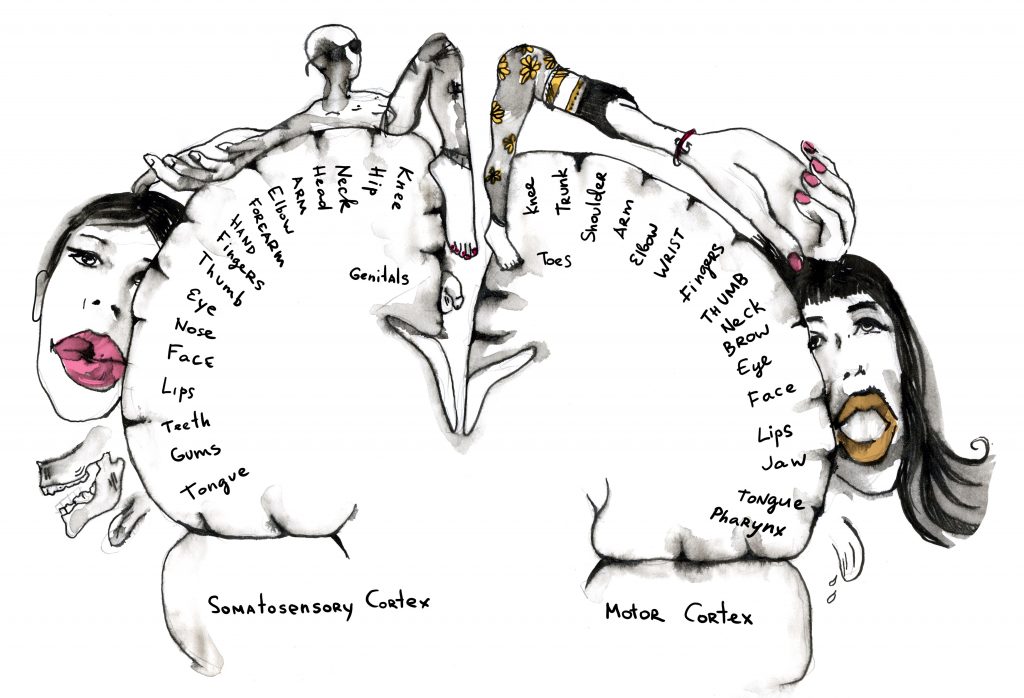
This is a map of your brain’s sensory and motor feedback and function. It shows where in the cortex input is interpreted, and how much priority is given to a certain region of your body. Note how much the hands, feet, and head are represented. Hmmm, they take up most of the space, must mean they are important, right?
This is great because it gives us our first practical tidbit: Efficient cueing should play on what the brain is most geared toward paying attention to!
I like to frame it like this: Where is the highest concentration of nerves? And based on that, where is the most efficient place to draw awareness to?
If you remember one thing from this article, make it the formula from the beginning:
Stimulation of a higher density of nerves in the area = More activation in our nervous system
An activated nervous system leads to more conscious & unconscious awareness, which translates to a safer & more efficient movement

Practicum
Ok, Garrett, you’ve got my attention! But now, how do I take that big fat juicy knowledge bomb and use it to empower my classes? Well my friend, wait no longer!
All of the information we’ve just gone through comes together in how we teach our students to move and perform yoga postures. And you know what? You’ve likely been practicing some form of all of this already without even realizing it — these concepts are naturally employed in how we assist our students in yoga postures!
Recall the basic forms of assisting:
- Cueing
- Demonstration
- Physically assisting
Cueing:
Cueing a posture is perhaps the most common form of teaching and assisting in a yoga classroom. It is also one of the best ways to implement all this new neuroscience we’ve been learning.

Why? Because there are actually two main forms of cueing that create ENTIRELY DIFFERENT REACTIONS from the nervous system!
Not sure what I mean? Think about this: if you tell your students to extend their arms forward and backward in Warrior II, they focus simply on their own body parts and how they move. This is called an internal cue. If, on the other hand, you tell them to point their arms to the front and the back of the room, you’re using an external cue.
The difference might seem trivial, but according to neuroscience, the external cue activates more feedback from your students’ nerves. This is because they now have to orient themselves to their environment, which means that they have to use additional feedback systems, like their sight, to figure out where they are in their space.
The result? A higher level of intrinsic activation and an increase in retention rate of the posture. In other words, your students are more likely to remember the alignment and engagement of Warrior II the next time they do it if you use an external cue.
Quick Summary
Internal cue:
Yogi focuses on their body parts and how they move
Ex: Warrior II – “Extend your arms forwards and backwards”
External cue:
Yogi focuses on effecting something in their environment. They focus on the outcome of their movement.
Ex: Warrior II – “Point your arms to the front and back of the room.”
I want to explain this one more time because I believe this is one of the most important and most accessible ways we can all practice Motor Control:
With the internal cue, the student is focused solely on their body.
Based on the Neuroscience, we learned one could conclude that this primarily relies on the specialized nerves I briefly mentioned in the beginning: proprioceptive and interoceptive nerves relaying to the brain where your body is in space.
Internal Cues are really good at helping someone achieve an increased level of depth via activation in a Yoga posture.
*By “activation” I am referring to engaging muscles, maintaining tension, or being aware of a particular alignment
With an external cue, the student now must orient themselves to their environment.
This obviously activates more feedback from our nerves because now we have to use other feedback systems like our sight to figure out our orientation! The result is a higher level of intrinsic activation and increases the retention rate of the posture, which means the student is more likely to remember how to do the general alignment of the posture.
External cues allow the student to interact more with their environment. This involves more nerves and often leads to higher activation of muscles as well as helps them discover their natural alignment.
THEY are using THEIR body in THEIR space based on you coaching them on how to interact with it.
As this is likely a bit foreign, to further your understanding: In an external cue, we give a direction for our students to move their body.
Here are a couple of extra examples of external cues:
- [Cobra Pose] “Headbutt the front of the room” – promotes axial extension and a more neutral position of the neck
- [3 Legged Downward Dog] “Lift your heel towards the sky/ceiling” – promotes pelvic neutral alignment vs. flaring of the hip outward
In my personal experience, I hear a lot more internal cues in yoga rather than external ones. We tend to prioritize this “feel your body”-type cueing because becoming aware of your body and mind is one of the primary intentions of yoga.
In the realm of teaching efficiently and effectively to our students, the larger question here is: which should we prioritize? External or internal cues?

The answer in yoga is always: it depends.
A good teacher employs both internal and external cueing. Whereas external cueing is good for first learning and retaining a posture, internal cueing is excellent for adding more perspective, engagement, and depth to a posture. In my classes, I like to use external cueing for beginners or to get more advanced practitioners into an initial pose. Once they’re there, I find that internal cues are best for getting people to connect with a posture at a higher level.
Specialized Cueing – Motor Recall:
There’s one more form of cueing you can use to create the ultimate level of safe, sustainable, & all around gorgeous yoga postures for your students: Motor Recall. You can almost think of it of a combination of internal & external cueing!
Simply put, this form of cueing draws your students back to the alignment and muscular engagement from another pose they’ve already been in.
My favorite examples include: “Find Cobra pose in Warrior III,” “Find Table Top pose in Halfway Lift,” and “Lift your heel skyward like Birddog, or Standing Splits in Warrior III.”
See what I’m doing? Provided that I’ve previously taught Cobra, Tabletop, Birddog, or Standing Splits these cues work marvelously because my students have to not only remember their previous alignment but also figure out how to apply it to a new posture. This is especially powerful when employed with advanced postures, but students can benefit in even the common ones!
Recalling a posture gives your students a chance to practice being human beings: use their ability to problem solve and find their own alignment in a new posture!
Remember, more nerves = more efficient and safer movement, right? Critical thinking is the epitome of being human and activates more conscious, higher order, areas of the brain. It activates more neurons & regions of their brain to listen, orient, think, remember, recall, & move! Allow your students to demonstrate that rather than give them a thousand cues, and watch in amazement at how perfectly they move their OWN bodies. It’ll also really help them make the movement a habit! (Motor Learning)

Demonstration:
This is pretty self-explanatory. Demoing refers to showing our students what the posture looks like. Because this involves the eyes, it is a bit more effective than verbal cueing when it comes to motor learning and posture retention. When your student sees you perform a pose, they’re not focused completely on themselves: their nervous system is working to see and imitate the shape or movement that you’ve shown them!
So a demonstration also offers another opportunity for our students to be human beings & think critically. Sometimes, it’s best to show our students how the posture looks and then allow them to practice it without cueing them.
Yeah, you heard me right. I know, this would probably be considered blasphemy in your yoga teacher training. But trust me, try shutting your mouth and letting them figure it out!
When you let them be, your students have to take in what their sight brought to their short-term memory, think about it, and process that to the best of their ability (hey there, Cortical Motor Learning!) After letting them give it a try, you can sit everyone down and offer group feedback, and then have them try it again. It’s absolutely magical and borderline voodoo how well demonstration works at getting your students into an advanced posture, and also having them retain that information for future attempts.
Physical Assisting:
I want to start with disclosing that physical assists are a pretty hot topic in the yoga world today. Whatever your thoughts are on physical assists, they are the most effective in communicating with the nervous system!

Those who know me know I’m a huge advocate of the regulation of physical assists in yoga, and I highly recommend Katy’s article if you wish to delve further into that subject.
A physical assist involves touch, which means it brings a whole new player into the game that verbal cues and vision-based demonstrations don’t use: mechanoreception. This is when certain nerve cells, called mechanoreceptor cells, detect pressure or other movement of your skin and relay that information to your brain.
Fun fact:
Your skin and your nervous system come from the same embryologic tissue, the ectoderm! Because they share the same embryonic origin, it means that your skin is deeply connected to your nervous system and relays SO MUCH info to your brain. Check that homunculus image again: almost everything represented on the sensory side is covered in skin cells!
So when I speak of the benefits of physical assists, I am not talking about the deepening-horrible-for-your-joints passive assists (there usually isn’t a lot of benefits to doing something passively, other than potentially hurting someone and racking up physiotherapy bills. I’ll have more about this in Part II: Passive is Passé). I’m talking about light touch and touch points: awareness-based assists. With permission from your students, you can add light touch to your teaching repertoire and be incredibly effective at engaging their nervous systems!
My favorite way of employing physical assists in my classrooms and with my patients is to reiterate verbal cues. Simply touch the area you’re verbally cueing to do something.
Take classic “Lengthen your spine [in poses like Downward Dog, ½ lift, or Table Top]” You can place your hand or fingers on your student’s sacrum and give a very light pull in the direction you want them to lengthen.
No pressure is needed, you just want to guide them in the direction you intend them to go! Physical touch is what we, chiropractors and other manual therapists, use all the time to help our patients achieve proper biomechanics. Stimulating nerves in the skin does an excellent job of communicating to the subcortical and cortical levels of the brain — it’s much more effective than verbal cueing and demonstration!
Mad Yoga Science Experiment:
For my teacher readers who aren’t afraid to do a little mad science in their classrooms try this: Lightly physically assist your student on only one side of a posture (so, something you do on both sides, like Warrior II). Then have the student practice the pose on the other side unassisted, and see if they retain your physical cue 😉
Ex: [In Warrior II] Lightly guide their knee over their ankle, or lightly press their pinky toe down on their back leg on their first side. When you switch sides observe and see if they automatically mimic your physical cueing.
In my experience, you’ll see a pretty amazing demonstration of the power of touch and motor learning in real time. And, it destroys the whole classic assist trope of “you need to physically adjust both sides,” too.
Conclusion:
Ok, that was a lot of really, really useful information, if I do say so myself. To help you retain as much as possible, here’s what I suggest you do: write down 3 things that stood out the most to you ASAP, and revisit this article in the near future.
In terms of implementing what you’ve learned, I’m sure you already know how to demonstrate to your classes, and while somewhat controversial, you may already be utilizing physical assists. These come relatively easily and are usually a part of yoga teacher trainings and workshops. So, I think the most important piece to practice from this article should be trying to convert your internal cues to external ones, and vice versa.
When I learned about motor control & learning, and their impact on cueing, I realized how much I relied on internal cues in my teaching. And, in the yoga classes I took, I also mostly heard internal cues! I’d guess that your experience has been similar. The most helpful thing I did to engrain this information was to write out and verbalize external cues.
But avoid going overboard! Remember a mixture is ideal, so begin to convert and implement a few and mix those in with what you’re already cueing.
Critical: Notice how this impacts your students! Do not be afraid to experiment and teach one class emphasizing external cues and another that emphasizes internal ones. Compare what you see and integrate that in your teaching!
Your experience and knowledge are the best guides to how effectively you teach!
That being said: read this again, and again, and again. This article will save you the $300 that other “gurus” may ask of you to take their seminars on the same information. My hope is that you see how essential these ideas are to teaching yoga postures, and my hope is that someday it will be a staple in all teacher trainings!
Motor Control & Learning is the very basis of how we learn to move!
Now go use those beautiful prefrontal cortexes and figure out how to best bring this into your mat, your yoga practice, & your life 😊

-Dr. YG
Works Cited & Additional Resources:
Books:
- Wolf, Adam Real Movement: Perspective on Motion & Motor Control
- Hardgrove, Todd Guide to Better Movement
Articles, Journals, & Websites:
- Riemann, Lephart “The Sensorimotor System, Part I: The Physiologic Basis of Functional Joint Stability” J Athl Train. 2002 Jan-Mar; 37(1): 71–79.
- Riemann, Lephart “The Sensorimotor System, Part II: The Role of Proprioception in Motor Control and Functional Joint Stability” J Athl Train. 2002 Jan-Mar; 37(1): 80–84.
- Physiopedia “Motor Control & Learning”
- Norman, Kyle “Coaching Movement: Internal vs External Cueing”
Illustrations by Ksenia Sapunkova
Edited by Jaimee Hoefert & Ely Bakouche
Enjoyed reading this article? Consider supporting us on Patreon or making a one-time donation. As little as $2 will allow us to publish many more amazing articles about yoga and mindfulness.